In this article:
- Why Changing Colors in Photoshop Matters for Designers
- Method 1: Hue/Saturation Adjustment Layer (The Versatile Approach)
- Method 2: Replace Color Tool (The Quick Solution)
- Method 3: Color Replacement Brush (The Precision Approach)
- Method 4: Selective Color Adjustment (The Professional's Choice)
- Method 5: Layer Blend Modes with Solid Color (The Creative Method)
- Method 6: Color Lookup Tables (The One-Click Solution)
- My Recommended Workflow for Color Changes in Photoshop
- Common Color Change Challenges (And How to Solve Them)
- Final Thoughts on Mastering Color Changes in Photoshop
Have you had this happen to you? Perhaps that stock photo would be perfect if only the background matched your brand palette. Or maybe you just want to experiment with different color options before making a final decision.
Whatever your reason, knowing how to change colors in Photoshop isn’t just a nice skill to have—it’s absolutely essential for any designer who wants to deliver high-quality, customized work efficiently.
In my decade-plus experience running a design business and coaching hundreds of freelancers, I’ve found that mastering color change techniques in Photoshop can be the difference between a 30-minute quick fix and a frustrating, hours-long ordeal that eats into your profit margins.
So today, I’m sharing my comprehensive guide on how to change the color of virtually anything in Photoshop. I’ll walk you through multiple methods—from the most basic to the more advanced—so you’ll always have the right tool for the job, regardless of what you’re working on.
Why Changing Colors in Photoshop Matters for Designers
Before we dive into the techniques, let’s quickly discuss why being proficient at color changes is so valuable:
Client flexibility: When a client asks, “Can we see this in our brand color?” you can confidently say yes.
Time efficiency: Knowing the right method for each situation saves you from trying multiple approaches through trial and error.
Expanded creative options: You can transform stock photos and existing assets to fit perfectly within your design vision.
Increased project value: The ability to efficiently customize colors can become a valuable upsell to clients who need variations of the same design.
Method 1: Hue/Saturation Adjustment Layer (The Versatile Approach)
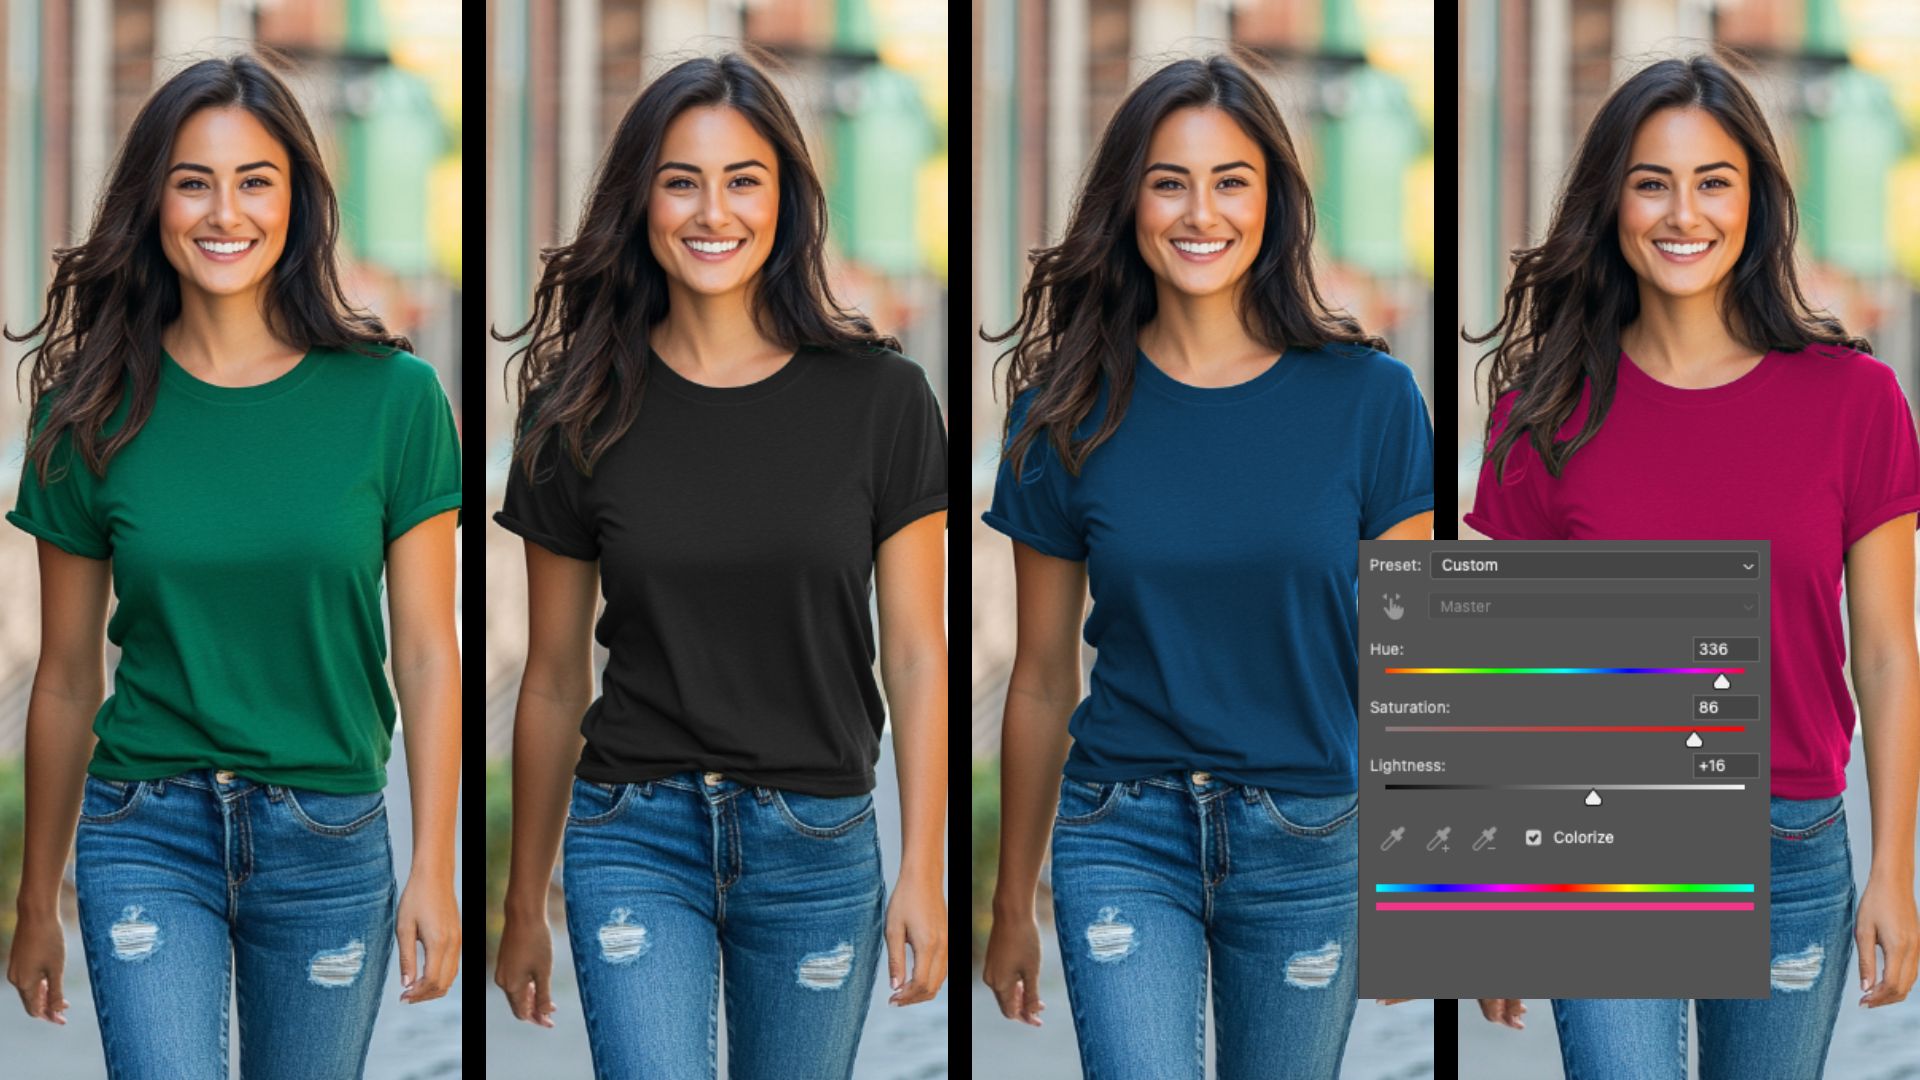
Let’s start with what I consider the Swiss Army knife of color change methods in Photoshop—the Hue/Saturation adjustment layer. This technique works well for changing colors across an entire image or in targeted areas.
How to Change Colors Using Hue/Saturation
Step 1: Open your image in Photoshop and navigate to the Layers panel. Click on the “Create new fill or adjustment layer” button (the half-filled circle icon) at the bottom of the panel and select “Hue/Saturation.”
Step 2: In the Properties panel that appears, you’ll see three main sliders:
Hue: This changes the actual color (moving from red to green to blue, etc.)
Saturation: This affects the intensity of the color (from gray to vibrant)
Lightness: This controls how bright or dark the color appears
Step 3: By default, the adjustment will affect all colors in the image. To target a specific color range, use the dropdown menu (initially set to “Master”) and select the color range closest to what you want to change—Reds, Yellows, Greens, Cyans, Blues, or Magentas.
Step 4: Fine-tune your selection using the eyedropper tools in the Properties panel. The regular eyedropper lets you select a specific color to adjust, while the “+” eyedropper adds colors to your selection and the “-” eyedropper removes colors.
Step 5: Adjust the sliders to change your selected color range. The Hue slider is particularly powerful—move it to completely transform one color into another.
Pro Tip: If you only want to affect certain parts of the image, add a layer mask to your adjustment layer and paint with black on the areas you want to protect from the color change.
Best for
This method is ideal when you need to change a specific color throughout an image while maintaining shading and texture. It’s particularly effective for:
Product color variations: Quickly show a client how their product would look in different colors
Clothing color changes: Transform the color of garments in fashion photography
Seasonal variations: Turn summer foliage into autumn colors
Method 2: Replace Color Tool (The Quick Solution)
When you need to make a targeted color change in a specific area, the Replace Color tool provides a direct approach that can be faster than setting up an adjustment layer.
How to Use the Replace Color Tool
Step 1: Open your image and go to Image > Adjustments > Replace Color. This will open a dialogue box with a preview window.
Step 2: Use the eyedropper tool in the dialogue box to select the color you want to change in your image. You can add to your selection by using the “+” eyedropper on additional areas, or refine it with the “-” eyedropper.
Step 3: Adjust the Fuzziness slider to control how many similar colors are included in your selection. Higher values will select a broader range of colors.
Step 4: Use the Hue, Saturation, and Lightness sliders to change your selected color to the desired new color.
Step 5: Click OK to apply the changes directly to your image.
Best for
The Replace Color tool is perfect for:
Quick mockups: When you need to show a client a color change without creating complex layer structures
Isolated objects: Changing colors of objects that are clearly distinct from their surroundings
Simple backgrounds: Transforming solid or relatively uniform background colors
One important note about this method: since it applies changes directly to your image rather than through an adjustment layer, it’s less flexible for further adjustments. I recommend duplicating your layer before applying this technique so you can always return to your original if needed.
Method 3: Color Replacement Brush (The Precision Approach)
When you need to change colors in very specific areas with fine control, the Color Replacement brush gives you the precision of painting your color changes exactly where you want them.
How to Use the Color Replacement Brush
Step 1: Select the Brush tool from the toolbar, then look in the Options bar at the top of the screen. Click on the brush type dropdown menu and select “Color Replacement Tool” (or press Shift+B until you cycle to it).
Step 2: In the Options bar, configure your brush settings:
Mode: Usually “Color” works best, as it preserves the underlying luminosity and only changes the hue
Sampling: “Continuous” samples colors as you paint, while “Once” only samples from your first click point
Limits: “Contiguous” only replaces colors that connect to each other, while “Discontiguous” replaces matching colors throughout the brush area
Tolerance: Controls how similar colors need to be to the sampled color to be replaced (higher values replace a broader range of colors)
Step 3: Select your foreground color (the new color you want to paint with) from the Color panel or by using the Color Picker.
Step 4: Adjust your brush size and hardness using the [ and ] keys, then paint over the areas where you want to change the color.
Pro Tip: Work on a duplicate layer to preserve your original image, and consider lowering the opacity of your brush for more subtle color transitions.
Best for
The Color Replacement brush excels at:
Complex objects: Changing colors in areas with intricate details or mixed colors
Selective retouching: Adjusting specific elements within a busy image
Photo restoration: Fixing discoloration in localized areas of photographs
Creative effects: Selectively colorizing parts of black and white images
Method 4: Selective Color Adjustment (The Professional’s Choice)
When you need precise control over specific color ranges with minimal impact on other colors, Selective Color adjustment layers are the tool of choice for professional colorists and retouchers.
How to Use Selective Color
Step 1: Create a Selective Color adjustment layer by clicking on the adjustment layer icon in the Layers panel and selecting “Selective Color.”
Step 2: In the Properties panel, use the Colors dropdown menu to choose which color range you want to modify: Reds, Yellows, Greens, Cyans, Blues, Magentas, Whites, Neutrals, or Blacks.
Step 3: Use the four sliders to adjust the selected color range:
Cyan (adds cyan or removes red)
Magenta (adds magenta or removes green)
Yellow (adds yellow or removes blue)
Black (adjusts the darkness or lightness)
Step 4: Move between different color categories to refine your adjustments. Often, a color in your image may span multiple categories (for example, an orange might be affected by both the Reds and Yellows adjustments).
Step 5: Use layer masks if you need to restrict the adjustment to specific areas of your image.
Best for
Selective Color adjustments are particularly effective for:
Subtle color grading: Creating cohesive color schemes across an entire image
Brand color matching: Precisely matching colors to brand guidelines
Color correction: Fixing color casts or balancing colors in photographs
Skin tone adjustments: Making natural-looking modifications to skin tones
Method 5: Layer Blend Modes with Solid Color (The Creative Method)
When you want to add a color tint or completely recolor an object while preserving its texture and details, blend modes combined with solid color layers offer creative possibilities that the other methods can’t match.
How to Change Colors Using Blend Modes
Step 1: First, isolate the object you want to recolor by making a selection around it. You can use any selection tool that works best for your image (Magic Wand, Object Selection, Pen Tool, etc.).
Step 2: Create a new layer by clicking the “Create a new layer” button in the Layers panel.
Step 3: With your selection still active, fill this new layer with your desired color. You can do this by selecting Edit > Fill and choosing “Color” as the content, or by setting your foreground color and pressing Alt+Backspace (Option+Delete on Mac).
Step 4: Change the blend mode of this new layer by selecting from the dropdown menu in the Layers panel. Different blend modes will create different effects:
Color: Applies the new hue while preserving the original luminosity and saturation
Overlay: Creates a more vibrant color change that interacts with the underlying contrast
Multiply: Darkens while adding color, good for adding depth
Screen: Lightens while adding color, good for brightening
Step 5: Adjust the opacity of the layer to control the intensity of the color change.
Pro Tip: For even more control, add adjustment layers above your color layer and clip them to it (Alt+click between the layers) to fine-tune the effect.
Best for
This method is ideal for:
Textures and patterns: Recoloring patterned fabrics or textured surfaces
Complete color overhauls: Dramatically changing an object’s appearance
Creative effects: Creating duotones, tritones, or stylized color treatments
Multiple variations: Quickly generating color alternatives by duplicating and changing the color layer
Method 6: Color Lookup Tables (The One-Click Solution)
For rapid color transformations or creating consistent color styles across multiple images, Color Lookup adjustment layers provide a powerful one-click solution.
How to Use Color Lookup Tables
Step 1: Create a Color Lookup adjustment layer by clicking the adjustment layer icon in the Layers panel and selecting “Color Lookup.”
Step 2: In the Properties panel, you’ll see three dropdown menus for different types of lookup tables. The most commonly used is “3DLUT File,” which contains a variety of preset color transformations.
Step 3: Click on the dropdown menu for 3DLUT File and explore the various presets. These include film stock emulations, color grading presets, and creative filters.
Step 4: Select a preset that moves your colors in the direction you want. You can adjust the opacity of the adjustment layer to control the intensity of the effect.
Step 5: Add a layer mask if you want to apply the color transformation selectively to specific areas of your image.
Pro Tip: You can combine multiple Color Lookup layers with different blending modes and opacities to create custom color transformations.
Best for
Color Lookup Tables excel at:
Consistent styling: Applying the same color treatment across multiple images
Film emulation: Creating looks that mimic specific film stocks or cinematic color grades
Quick mood changes: Rapidly transforming the emotional tone of an image through color
Starting points: Creating a base for further customized color adjustments
My Recommended Workflow for Color Changes in Photoshop
After years of changing colors in countless projects, I’ve developed a workflow that ensures consistent, high-quality results. Here’s what I recommend:
Step 1: Analyze Your Image and Goal
Before selecting a method, ask yourself:
What am I trying to change? A specific object, an entire color range, or the overall color mood?
How precise does the selection need to be? Will a rough color range selection work, or do I need pixel-perfect precision?
How natural does the result need to look? Am I going for photorealism or a creative effect?
Step 2: Prepare Your Image
Always work non-destructively. Either duplicate your original layer or use adjustment layers.
Make any necessary selections first. If you’re changing a specific object, take time to make a clean selection before applying color changes.
Consider creating a snapshot (Window > History > Create New Snapshot) before making major color changes.
Step 3: Apply the Appropriate Method
Based on your analysis in Step 1, choose the most appropriate method from those we’ve covered:
For overall color adjustment: Start with Hue/Saturation
For specific defined areas: Try Replace Color or Color Replacement Brush
For precise professional control: Use Selective Color
For creative effects or texture preservation: Use blend modes with solid colors
For consistent styling or quick transformations: Try Color Lookup Tables
Step 4: Refine Your Results
Check edges for color fringing or haloing, especially around high-contrast boundaries.
Evaluate in context. Zoom out and view your entire image to ensure the color change looks natural in its surroundings.
Consider adding subtle textures (like noise or grain) to help integrated heavily modified areas with the rest of the image.
Common Color Change Challenges (And How to Solve Them)
Even with these powerful techniques, you’ll occasionally run into tricky situations. Here are solutions to the most common color change challenges:
Challenge: Color Fringing Around Edges
Solution: Use the Defringe option (Select > Modify > Defringe) on your selection before applying color changes, or manually clean up edges with a small eraser on your adjustment layer mask.
Challenge: Preserving Metallic or Reflective Surfaces
Solution: Use blend modes like “Color” that preserve luminosity, or manually paint on the layer mask to protect highlight areas.
Challenge: Matching Exact Brand Colors
Solution: Use Selective Color adjustments for fine-tuning, and confirm accuracy by sampling your result with the eyedropper and comparing to your target color values.
Challenge: Realistic Fabric Color Changes
Solution: Add a subtle Noise filter (Filter > Noise > Add Noise) at 1-2% to your color layer to simulate fabric texture, and consider adding shadows and highlights with Dodge and Burn tools.
Final Thoughts on Mastering Color Changes in Photoshop
Changing colors in Photoshop is one of those fundamental skills that separates professional designers from amateurs. The methods I’ve shared represent different approaches for different situations—there’s no single “best” way to change colors in every scenario.
The key is to understand the strengths and limitations of each technique, and to choose the right tool for the specific challenge you’re facing. With practice, you’ll develop an intuition for which method will get you to your desired result most efficiently.
Remember that non-destructive workflows (using adjustment layers and masks) almost always beat direct pixel editing when it comes to color changes. They give you the flexibility to refine your work and respond to client feedback without starting over.
Finally, don’t be afraid to combine methods. Some of the most impressive color transformations I’ve seen use multiple techniques layered together—perhaps a Hue/Saturation adjustment for the base change, Selective Color for fine-tuning, and a touch of the Color Replacement brush for local refinements.
Master these techniques, and you’ll be able to transform colors with confidence, delivering exactly what your clients need—even when they change their minds three times in the same day.
Have you tried any of these color change methods? Do you have a favorite technique that I didn’t cover? I’d love to hear about your experiences in the comments below!