In this article:
- Understanding Photoshop drop shadows: More than just a pretty effect
- How to add a basic drop shadow in Photoshop
- Understanding drop shadow settings: The key to realistic shadows
- Common drop shadow mistakes and how to avoid them
- Advanced technique: Creating manual drop shadows for complete control
- Real-world applications: Making drop shadows work for you
- Taking it to the next level: Creative drop shadow effects
- Wrapping up: From basic to brilliant
One of the most powerful yet often misunderstood tools in our PSD arsenal is the drop shadow.
I’ve spent over a decade working with designers of all skill levels, and I’ve noticed that while many use drop shadows, few truly understand how to leverage them for maximum impact. The difference between a poorly executed drop shadow and a masterfully crafted one can make or break your design.
In this comprehensive guide, I’ll walk you through everything you need to know about creating and customizing drop shadows in Photoshop that will elevate your designs and impress your clients. Let’s dive in.
Understanding Photoshop drop shadows: More than just a pretty effect
At its core, a drop shadow creates the illusion that one element is hovering above another, casting a shadow onto the layers beneath it. This simple visual trick adds depth and dimension to your designs, making them feel more real and engaging to viewers.
But drop shadows are far more than just decorative elements. When used strategically, they can:
Create depth and dimension in flat designs
One of the biggest challenges in digital design is making 2D elements feel like they exist in 3D space. Drop shadows are one of the simplest ways to achieve this effect. By carefully adjusting the direction, distance, and softness of your shadows, you can create a convincing illusion of depth that draws viewers into your design.
Improve readability and visual hierarchy
Ever struggled to make text legible over a complex background? A subtle drop shadow can be the difference between text that disappears into the background and text that pops off the page. This technique is especially crucial for headline text, logos, and any text that needs to stand out.
Enhance product photography
If you’re creating product images for clients, a well-crafted drop shadow can make products look more premium and professional. This is particularly important for e-commerce designs where the quality of product presentation directly impacts conversion rates.
Create realistic photo composites
When combining multiple images into a single composition, matching the shadows to the lighting in your base image is essential for creating a believable result. Mastering drop shadows will help you create photo manipulations that look natural rather than obviously edited.
How to add a basic drop shadow in Photoshop
Let’s start with the fundamentals. Adding a basic drop shadow in Photoshop is straightforward, but understanding each step will give you a solid foundation for more advanced techniques later.
The layer style method (fastest approach)
Step 1: Select your layer – First, open your Photoshop document and select the layer you want to add a drop shadow to. This can be text, a shape, an image with transparency, or any other element.
Step 2: Access the Layer Style dialog – Click the “fx” icon at the bottom of the Layers panel and select “Drop Shadow” from the menu. Alternatively, you can go to Layer > Layer Style > Drop Shadow from the top menu.
Step 3: Customize your shadow – In the Layer Style dialog box that appears, you’ll see various settings for customizing your drop shadow. We’ll dive deeper into these settings later, but for now, experiment with the Opacity, Distance, and Size sliders to get a feel for how they affect your shadow.
Step 4: Apply your changes – Once you’re happy with how your shadow looks, click “OK” to apply the effect. The drop shadow will now be attached to your layer, and you can adjust it further at any time by double-clicking on the “fx” icon next to your layer in the Layers panel.
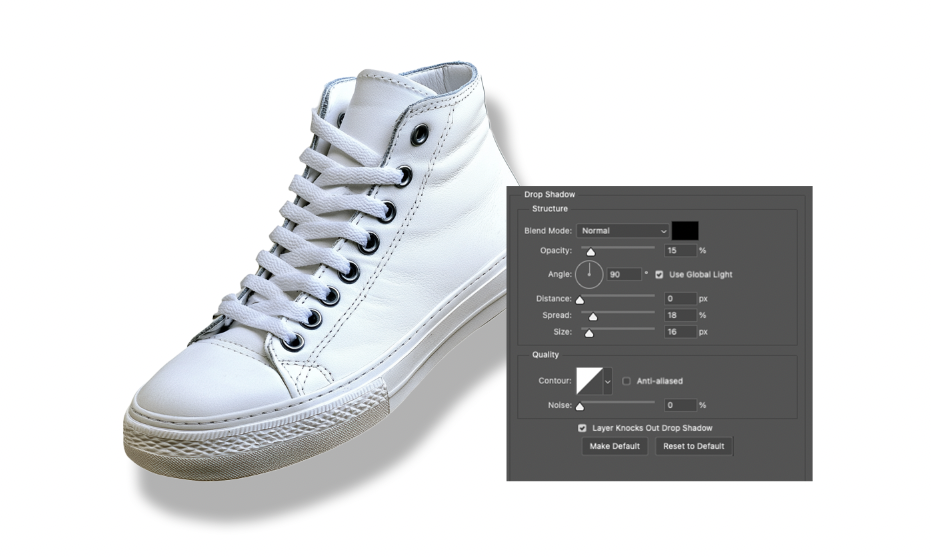
Understanding drop shadow settings: The key to realistic shadows
Now that you know the basics, let’s explore each setting in the Drop Shadow dialog box to understand how they affect your shadow’s appearance. Mastering these settings is the difference between an amateur-looking effect and a professional one.
Blend Mode
The Blend Mode determines how your shadow interacts with the layers beneath it. For most natural-looking shadows, “Multiply” is the go-to choice as it darkens the underlying layers. However, “Linear Burn” can create deeper shadows, while other blend modes can produce unique creative effects.
Opacity
This setting controls how transparent your shadow is. A value of 100% creates a completely opaque shadow, while lower values make it more transparent. For realistic shadows, I typically recommend staying in the 50-75% range, as real-world shadows are rarely completely black.
Angle
The Angle determines the direction of your light source and, consequently, where your shadow falls. When working on a project with multiple shadowed elements, maintaining a consistent angle creates a cohesive lighting effect. The “Use Global Light” checkbox ensures all layer styles in your document use the same light angle.
Distance
This setting controls how far your shadow extends from your object. Greater distances create the impression that the object is floating higher above the surface, while shorter distances make it appear closer to the background.
Spread
Spread affects how the shadow transitions from its darkest point to full transparency. Higher spread values create shadows with harsher, more defined edges, while lower values produce softer transitions.
Size
The Size setting determines how large and diffused your shadow appears. Larger sizes create softer, more spread-out shadows (as if the light source is larger or more diffused), while smaller sizes create sharper, more defined shadows.
Contour
For advanced users, the Contour option lets you control precisely how your shadow fades out. Different contour presets create different fading patterns, which can be useful for creating unique shadow effects.
Noise
Adding a small amount of noise to your shadow can prevent it from looking too perfect and digital. This subtle texture can make your shadows look more natural, especially when working with textured backgrounds.
Common drop shadow mistakes and how to avoid them
After years of reviewing designer portfolios and coaching freelancers, I’ve noticed some common mistakes that can instantly mark your work as amateur. Here’s how to avoid them:
Using the default settings
One of the biggest telltale signs of beginner work is using Photoshop’s default drop shadow settings without any customization. These defaults rarely produce the best results for specific design contexts. Always take the time to adjust your shadow settings to match your specific design needs.
Shadows that are too dark or opaque
Real-world shadows are rarely pure black and completely solid. Using a drop shadow with 100% opacity and the default black color often looks unnatural and heavy-handed. Try reducing the opacity and slightly adjusting the shadow color to match your lighting scenario.
Inconsistent light sources
If different elements in your design have shadows falling in different directions, it creates a disjointed, unrealistic effect. Maintain a consistent light source throughout your design by using the “Use Global Light” option when possible.
Over-reliance on drop shadows
While drop shadows are useful, they shouldn’t be your only tool for creating depth. Combining them with other techniques like subtle gradients, overlapping elements, and size variation creates more sophisticated depth effects.
Advanced technique: Creating manual drop shadows for complete control
While the Layer Style method works great for most situations, there are times when you need more control over your shadows. Here’s a professional technique for creating custom drop shadows that gives you more flexibility:
Step 1: Duplicate and position your layer
Select the layer you want to create a shadow for and duplicate it (Ctrl/Cmd+J). Move this duplicate layer below your original in the layer stack.
Step 2: Transform your shadow layer
With the duplicate layer selected, use the Transform tool (Ctrl/Cmd+T) to adjust its position and perspective. For a typical drop shadow, you might shift it slightly down and to one side, but you can get creative with the positioning for unique effects.
Step 3: Fill with black and reduce opacity
Fill your duplicate layer with black by selecting it and using Edit > Fill > Black (or pressing Shift+F5 and selecting Black). Then, reduce the layer’s opacity to create a more natural shadow effect.
Step 4: Apply blur
To soften your shadow, go to Filter > Blur > Gaussian Blur and adjust the radius until you achieve the desired softness. Larger radius values create softer, more diffused shadows, while smaller values keep the shadow more defined.
Step 5: Fine-tune with layer masks
Add a layer mask to your shadow layer and use a soft brush to gently fade parts of the shadow that should be less intense. This gives you precise control over the shadow’s shape and intensity in different areas.
Real-world applications: Making drop shadows work for you
Understanding the technical aspects of drop shadows is only half the battle. Knowing when and how to apply them in real-world design scenarios is what truly sets professional designers apart. Here are some practical applications to consider:
Creating readable text over complex images
When placing text over photographs or busy backgrounds, a subtle drop shadow can improve readability without requiring additional elements like text boxes or overlays. Keep the shadow distance small and the size just large enough to create separation from the background.
Enhancing UI elements
In web and app design, subtle drop shadows can indicate which elements are interactive or at a higher level in the visual hierarchy. For UI elements, keep shadows light and subtle—just enough to create a slight lift effect without being distracting.
Product photography enhancement
When shooting products on white backgrounds, replacing the natural shadow with a custom drop shadow gives you complete control over the presentation. This technique is especially valuable for e-commerce sites where consistent product imagery is crucial.
Creating depth in flat illustrations
If you’re working with illustrations or icons, strategic drop shadows can transform flat graphics into more dimensional designs. For illustrated elements, consider using shadows with slightly more stylized properties to match the illustration style.
Taking it to the next level: Creative drop shadow effects
Once you’ve mastered the basics, you can start experimenting with more creative and stylized shadow effects:
Long shadows
Popular in flat design and material design aesthetics, long shadows extend far from their object at a consistent angle. To create this effect, follow the manual shadow method but use the Transform tool to dramatically extend your shadow in one direction.
Colored shadows
Shadows don’t always have to be black or gray. For more stylized designs, try using colored shadows that complement your color scheme. In the Drop Shadow dialog, click on the color swatch to choose a custom shadow color.
Multi-directional lighting
For more complex scenes, you might want to simulate multiple light sources. This requires creating several shadow layers with different angles and intensities. While more time-consuming, this approach can create strikingly realistic lighting effects.
Reflection shadows
To create a reflection effect (like an object sitting on a glossy surface), create a flipped copy of your object, reduce its opacity, add a gradient mask to fade it out, and position it as if it were reflected on a surface.
Wrapping up: From basic to brilliant
Drop shadows may seem like a simple effect, but as we’ve explored, there’s a depth of knowledge and technique behind using them effectively. When applied with intention and attention to detail, they can transform your designs from flat and lifeless to dynamic and professional.
Remember, the goal isn’t to make your shadows noticed—it’s to use them so naturally that they enhance your design without drawing attention to themselves. As with many aspects of design, subtlety is often the key to sophistication.
I encourage you to experiment with the techniques we’ve covered, paying attention to how shadows work in the real world and trying to recreate those natural effects in your digital designs. With practice and careful observation, you’ll develop an intuitive understanding of how to use drop shadows to elevate every project you touch.
And isn’t that what great design is all about? Taking seemingly small details and using them to create a more engaging, effective, and professional result for your clients and audience.